 This post is the second, in a series that will consider the topic of predictive auto-scaling of vSphere VMs and containerized services. The purpose of this post is to describe how to build the first components with the installation and configuration of Docker and Kubernetes on VMs. I will be using Docker 1.13, Kubernetes 1.10, and CentOS 7 x64 for the implementation.
You will need either a vSphere environment or VMware Workstation/Fusion, CentOS install media, and an internet connection. There are a handful of ways to implement a test-bed Kubernetes cluster. Running on a cloud provider CaaS platform, orchestrating as a Docker-in-Docker deployment, building manually from scratch, or building with a helper tool from scratch.
I will be using the Kubernetes kubeadm helper tool to build from scratch. This process will work on bare-metal and VMs to build your own on-premises k8s cluster. It delivers a single-master cluster with RBAC, DNS, and other required services. Kubeadm intends to automate many of the manual tasks required to stand a kubernetes cluster up (e.g. certificates creation, config file creation, etc.). Additional understanding and configuration is required to extend to more complex use cases.
Download the CentOS installation media from https://www.centos.org/download/. The “Minimum” install ISO is sufficient. We will create a single VM to serve as a template and then make copies to implement our master and worker nodes.
Create a VM with 2 GB of RAM and 20 GB of disk. Select “I will install the OS later” option. Once the VM is created, connect its CD/ROM drive to the CentOS install media ISO. Power on the VM and proceed with the CentOS install as follows:
- Select minimum install option
- Accept default install volume
- Configure network card to be enabled and provide appropriate IP config
- Create a user with Admin privileges
After OS installation, login with the non-root admin account you created and begin preparing for installation of Docker and Kubernetes. You may want to configure a few things on your OS image to make life easier. I typically customize the command prompt to display IP address of the host, install Nano editor, and configure SSHD with certificates. Do whatever you typically do. From here out, I will provide each step in the CLI format so you can copy and paste.
The first step is to update the base image:
- sudo yum update -y
We need to change some default settings in order to prepare our template and allow our Kubernetes service to run properly.
- hostnamectl set-hostname K8s-Template
- We’re setting the host name to “K8s-Template”, we will change this for the appropriate role when we copy this template.
- systemctl restart systemd-hostnamed && exec bash
- sestatus
- See that the default is enabled and enforcing.
- setenforce 0
- Execute sestatus again to verify that current mode is now set to permissive. In the next step, we will edit the config file so that the change is persistent. I will use nano as the editor in the next command. Replace nano with your editor if different.
- sudo nano /etc/sysconfig/selinux
- Change the line that says “SELINUX=enforcing” to “SELINUX=disabled” and exit/save your change.
- sudo swapoff -a
- This command disables swapping to disk. It is a requirement for Kubernetes to run properly. In the next command, we will change the config file to make the setting persistent.
- sudo nano /etc/fstab
- Locate the line that includes “swap” (typically the third non-commented line in a minimal install with one disk)
- Edit the line so that it begins with a “#” to indicate it is remarked out. Exit/save your changes.
- sudo nano /etc/hosts
- For each host (e.g. k8s-master, k8s-wn1, etc.) you plan to use, add hostname followed by planned IP address to the hosts file on each node in the cluster. If using DNS, create your records there.
We can install Docker and Kubernetes at the same time, but I will separate the two so that you can stop at Docker if that’s all you’re interested in for now.
Install Docker:
- sudo yum install docker -y
- sudo systemctl enable docker
- sudo groupadd docker && sudo usermod -aG docker $– USER
- logout and back on after step 3.
- If you don’t logout and back in after step 3, you will receive permission errors when trying to execute the docker commands.
- systemctl restart docker
That’s it for creating a standalone Docker host. To test your installation, try out some docker commands:
- docker info
- docker run hello-world
- docker image ls
If you plan to run Docker Swarm (Instead of Kubernetes), you will need to execute the following commands (Copy and paste the entire block as one line. All commands that are listed under a single number are intended to be executed as one CLI input.). If not, skip this step.
-
sudo firewall-cmd --add-port=2376/tcp --permanent && sudo firewall-cmd --add-port=2377/tcp --permanent && sudo firewall-cmd --add-port=7946/tcp --permanent && sudo firewall-cmd --add-port=7946/udp --permanent && sudo firewall-cmd --add-port=4789/udp --permanent && sudo firewall-cmd --reload && sudo systemctl restart docker
Next, we install Kubernetes. The first step is to add a repo pointer for YUM installer to locate the Kubernetes distribution
- sudo nano /etc/yum.repos.d/kubernetes.repo
- Add the block from step 2 (below) to the file, exit/save. There is an easier way to do this with a cat redirect, but my WordPress formatting tends to break it when copied and pasted.
-
[kubernetes]
name=Kubernetes
baseurl=https://packages.cloud.google.com/yum/repos/kubernetes-el7-$basearch
enabled=1
gpgcheck=1
repo_gpgcheck=1
gpgkey=https://packages.cloud.google.com/yum/doc/yum-key.gpg https://packages.cloud.google.com/yum/doc/rpm-package-key.gpg
-
sudo firewall-cmd --permanent --add-port=6783/tcp && sudo firewall-cmd --permanent --add-port=6443/tcp && sudo firewall-cmd --permanent --add-port=2379-2380/tcp && sudo firewall-cmd --permanent --add-port=10250/tcp && sudo firewall-cmd --permanent --add-port=10251/tcp && sudo firewall-cmd --permanent --add-port=10252/tcp && sudo firewall-cmd --permanent --add-port=10255/tcp && sudo firewall-cmd --reload && sudo modprobe br_netfilter && sudo sysctl net.bridge.bridge-nf-call-iptables=1 && sudo sysctl net.bridge.bridge-nf-call-ip6tables=1
- The above commands configure the firewall for ports required by Docker, Kubernetes, and Weav-Net. These are the three components being used together here. Optionally, you could execute sudo systemctl disable firewalld && systemctl stop firewalld to disable the firewall in a lab environment.
- sudo yum install kubeadm -y
- This will install kubeadm, along with the binaries required to run Kubernetes.
- kubectl config view
- This will confirm that kubectl is operational and we have a blank config. There are two primary commands we’ll use with kubeadm to provision our cluster; kubeadm init and kubeadm join. Init is performed to create the master. Once executed, we expect kubectl view config to convey configuration that was performed.

- This will confirm that kubectl is operational and we have a blank config. There are two primary commands we’ll use with kubeadm to provision our cluster; kubeadm init and kubeadm join. Init is performed to create the master. Once executed, we expect kubectl view config to convey configuration that was performed.
- systemctl enable kubelet
- systemctl daemon-reload && systemctl restart kubelet
VERY IMPORTANT: Shut your VM down at this point and move forward with full clones of it. This is our template and it is complete.
Create a full clone of your template VM and power it on. Our first clone will be called k8s-master. Set your host name as we did earlier and configure IP settings for a unique address.
The next step is to define our host as a K8s Master and stand up the cluster. For the K8s master and cluster to operate, we need to install a network overlay (These are drop-ins/pluggable components within the K8s architecture), and we need to copy some config information for our non-root user account to manage the cluster. But we first have to create a cluster master config before we can do that. So we’ll create the master and it will be in a “not ready” state while we go back and complete the rest.
Be patient with the next command (Having 4 GB of RAM assigned to your VM will help it run faster, but not required). It can take longer than expected to complete. Grab a coffee or take a short walk.
- sudo kubeadm init
This single command sets up all of the components for a basic K8s cluster. There are many optional flags that can be included, depending on your desired end state. If all went well, you will eventually see something similar to the screenshot below:
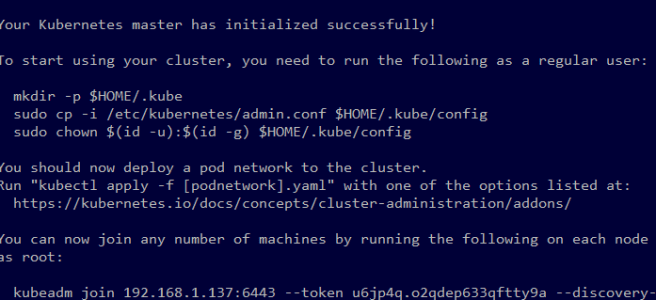
(As an aside: you’ll notice that some of the images within this post indicate Kubernetes 1.9.6 , and others indicate 1.10. While building out for this post, K8s latest distribution went from 1.9.6 to 1.10. I’ve completed installation with 1.10 with the same Docker 1.13 and Centos 7, and they both work. I believe there is a reference to CoreDNS running in one of my posts with 1.9.6. Prior to release, 1.10 was anticipated to replace Kube-DNS with CoreDNS . A ‘feature gate’ flag was used to install CoreDNS with 1.9.6. My current 1.10 is still deploying Kube-DNS. To deploy CoreDNS, use –feature-gates CoreDNS=true with the kubeadm init command)
Of course, you could see any number of messages that are short of success. Some might even give you an idea of what is wrong. Most won’t.
Be aware, kubectl get nodes will return “Ready” status even when a node is not in a functional state (It will return ready for a node that isn’t powered on.). Rely on the logs (systemctl status -l kubelet) to confirm that the nodes are healthy.
If you have clean logs and ready state, then: congratulations, your Kubernetes cluster is configured and running! Now we simply need to copy our template again, provide a unique hostname (e.g. k8s-wn1, k8s-wn2, etc.), and use kubeadm join at the command prompt to join the cluster. If not, Google and try to fix it until you give up. Then, start again the next day. This is the reality of an unsupported distribution of K8s.
systemctl status -l kubelet and journalctl -xeu kubelet allow us to view the current log info for kubelet. Within the output, we may find a hint. We should expect to see errors logging for lack of network, because we haven’t installed the overlay just yet. But if there are other errors, we can try to fix them. I will cover some ‘usual suspects’ in a moment. For now, and whether or not we have a successful init or not, we want to perform the following:
- mkdir -p ~/.kube
- sudo cp -i /etc/kubernetes/admin.conf ~/.kube/config
- sudo chown $(id -u):$(id -g) ~/.kube/config
- systemctl daemon-reload && systemctl restart kubelet
We will do the above again, every time the K8s master starts acting weird at the console. Anytime we make a change to K8s, we will do the above (Sans number 1). When in doubt, do the above. You may initially run those 3 steps so often, I recommend writing a script to call.
Another item to check are the .conf files in /etc/kubernetes/ of your master node. If you have performed kubeadm init and then change a hostname or IP address, you need to update those files, then run steps 2-4 above again.
When all else fails, kubeadm reset will reset the config to blank and allow you to start over with kubeadm init. Every time you run kubeadm init, you tear down the existing cluster and start anew, but kubeadm reset clears out data that persists.
After every kubeadm init, we run:
- sudo cp -i /etc/kubernetes/admin.conf ~/.kube/config
- sudo chown $(id -u):$(id -g) ~/.kube/config
- systemctl daemon-reload && systemctl restart kubelet
After a successful init. You will see that it displays a “join” instruction line to execute on worker nodes we add to the cluster. No need to remember this now, we can pull it back up later. We now need to install a network overlay.
Perform the following commands to apply your network overlay.
- kubectl get nodes
- You will see your master in the “Not Ready” state
- kubectl get pods –all-namespaces
- You will see the 7 pods kubeadm had created. DNS is pending because it is waiting on the netwrk.
-
kubectl apply -f "https://cloud.weave.works/k8s/net?k8s-version=$(kubectl version | base64 | tr -d '\n')"- Here we are implementing the weave network overlay. There are many, including NSX-T by VMware, this is a simple get-started-and-testing overlay for now. We can change this network out later if we want to test another.
After a coffee break, you can run kubectl get nodes again and you should see that your Master node is now in Ready status, and kubectl get pods –all-namespaces to see that all of your pods are now running.
The command I referred to earlier that will again show you the join command at your master CLI, with the unique token, is:
- sudo kubeadm token create –print-join-command
- Copy the output to the ‘clipboard’
- Create a full clone from your k8s template
- Set the host name to k8s-wn1 (or something that makes sense to you) and make the IP addr/config unique.
- Make sure your /etc/hosts file has correct hostnames and IPs.
- Paste the command you copied in step 1 and execute to join the node to the cluster.
- Repeat steps 2 – 5 to create a second (or as many as you’d like) worker node.
Once you’ve executed the join command, you can return to your master node, run kubectl get nodes, and verify that your worker nodes have registered.

Verify that your Weave-Net overlay is operational:
- curl -sSL -o ~/.local/bin/weave https://github.com/weaveworks/weave/releases/download/latest_release/weave && chmod 770 ~/.local/bin/weave
- weave status
- We expect to see 1 connection as ‘failed’. This is the master failing to connect to itself. Verify with the command below.
- weave status connections

 That’s all there is, you now have a cluster that you can expand and contract as needed.
In the next post, I will be working on conveying the lab methodology to prove out a likely roughly coded automation for scaling the VM infrastructure in tandem with the containers. This will first be a manual process, then I will follow it with a fully automated.
Finally, I will aim to prove out an automated scaling operation utilizing predictive analytics.